Oracle Database 12.2.0.1 slim with kubernetes on Windows

May 29, 2018

Just a summary of the k8s yaml files required to run an Oracle database 12.2.0.1 slim edition in a container on k8s with Docker for Windows on Windows 10.

Create a persistent volume and a corresponding claim to persist the oradata.

kind: PersistentVolume
apiVersion: v1
metadata:
  name: ora-pv-volume
  labels:
    type: local
spec:
  storageClassName: manual
  capacity:
    storage: 10Gi
  accessModes:
    - ReadWriteMany
  hostPath:
    path: "/host_mnt/d/Workspace/oracle/database-persistent-volume"
kind: PersistentVolumeClaim
apiVersion: v1
metadata:
  name: ora-pv-claim
spec:
  storageClassName: manual
  accessModes:
    - ReadWriteMany
  resources:
    requests:
      storage: 10Gi

Create a deployment with a replicaset and a container running within 1 pod.

apiVersion: extensions/v1beta1
kind: Deployment
metadata:
  name: oracle-database
spec:
  replicas: 1
  template:
    metadata:
      labels:
        app: oracle-database
    spec:
      containers:
        - name: oracle-database
          image: store/oracle/database-enterprise:12.2.0.1-slim
          volumeMounts:
            - mountPath: "/ORCL"
              name: ora-pv-storage
            - mountPath: /dev/shm
              name: dshm
          ports:
            - containerPort: 1521
      volumes:
      - name: ora-pv-storage
        persistentVolumeClaim:
          claimName: ora-pv-claim
      - name: dshm
        emptyDir:
          medium: Memory
          sizeLimit: "1024Mi"

From inside the container:

Connect to the container:

kubectl exec -it oracle-database-5599d855c7-n8qfm /bin/bash

Once connected, open sqlplus and log on:

[oracle@oracle-database-5599d855c7-n8qfm /]$ sqlplus / as sysdba
SQL*Plus: Release 12.2.0.1.0 Production on Tue May 29 07:30:37 2018
Copyright (c) 19822016, Oracle.  All rights reserved.
Connected to:
Oracle Database 12c Enterprise Edition Release 12.2.0.1.0 - 64bit Production

From outside the container:

Let’s take SQLDeveloper as a client:

Oddly enough the username to connect from outside the container is different: SYSTEM (instead of SYS). The password is the same that comes with the slim version by default: Oradoc_db1

The issue is reported here: https://github.com/oracle/docker-images/issues/525

AES Symmetric Encryption Using Javascript and ColdFusion

August 20, 2015

This article is just a small demo on how to use the same AES symmetric encryption on the client-side (javascript) and the server-side (ColdFusion).

The goal is to generate a key on the server-side (for example each time a user logs in, when the session is created, a unique key is generated and stored in the session), this key is then sent to the browser to encrypt form fields on the client-side which can then be sent encrypted to the server, where they can be decrypted again with the key from the session, to obtain the original values.

For completeness, I will show both how to encrypt and decrypt on the serverside first, using ColdFusion, as well as how to encrypt and decrypt on the client-side, using javascript.

For the generation of the key, I decided to use the underlying jvm, because the native ColdFusion generateKey method doesn’t allow for the generation of an InitializationVector, which leads to weaker security.

The ColdFusion example:

rawString = "Wazzaaaaaap";

// gimme a java KeyGenerator, SecretKey and InitializationVector
r = CreateObject("java","java.security.SecureRandom").init();
Cipher = CreateObject("java","javax.crypto.Cipher");
Iv = CreateObject("java","javax.crypto.spec.IvParameterSpec");
SecretKey = CreateObject("java","javax.crypto.SecretKey");
c = Cipher.getInstance("AES/CBC/PKCS5PADDING");
KeyGenerator = CreateObject("java","javax.crypto.KeyGenerator");

// generate IV
byteClass=createObject("Java","java.lang.Byte").TYPE;
newSeed = r.generateSeed(16);
r.setSeed(newSeed);
byteIV = createObject("Java","java.lang.reflect.Array").newInstance(byteClass, javacast("int", 16));
r.nextBytes(byteIV);
IV = Iv.init(byteIV);
jIV = binaryEncode( IV.getIV(), "base64" );

// generate Key
newSeed = r.generateSeed(32);
r.setSeed(newSeed);
keyGen = KeyGenerator.getInstance("AES");
sRandom = r.getInstance("SHA1PRNG");
keyGen.init(256, sRandom);
s_KEY = keyGen.generateKey();
jKey = binaryEncode( IV.getIV(), "base64" );

strToEncrypt = javacast("String", rawString);
writeOutput('strToencrypt: ');
writeDump(strToEncrypt);
byteToEncrypt = strToEncrypt.getBytes("UTF-8");
c.init(Cipher.ENCRYPT_MODE, s_KEY, IV, r);
encryptedBytes = c.doFinal(byteToEncrypt);

writeOutput('encryptedBytes: ');
writeDump(encryptedBytes);

c.init(Cipher.DECRYPT_MODE, s_KEY, IV);
plainByte = c.doFinal(encryptedBytes);
writeDump(plainByte);
plainText = toString(plainByte);
writeOutput('plainText: ');
writeDump(plainText);

For the javascript encryption/decryption, it’s easy to use an existing AES encryption library, like crypto-js on googlecode.

The JavaScript example:

Streaming a pdf from a streamReader to a browser with ColdFusion 10

August 26, 2014

Following up on my article on ‘retrieving a MIME-encoded binary attachment through MTOM with ColdFusion 10’, it was only logical that I had to send the content i retrieved to the browser.
Remember, we received the content from a webservice through a streamReader.

Now there’s two ways to go at it sending it to the browser. One could appended all the bytes from the stream to variable, and wrap it in a cfcontent tag to send it to the browser. This would of course consume a substantial amount of memory from the JVM running the CF engine, because the whole content has to be recreated in memory.

In my particular case, the content would be pdf files, which can be streamed to pdf reader plugins in the browser. The advantage of streaming a pdf file is that an intelligent pdf reader can already render the first pages while the next pages are still being received, hence for large pdf files the user doesn’t have to wait until the complete document is downloaded before he can start reading it.

Additionally, if we could forward the stream we receive from the webservice directly to the browser, the only memory we would consume would theoretically be the size of our byteArray buffer.

I found a few articles on streaming binary content to a browser, all of which dated before 2011. Unfortunately none of those worked on my ColdFusion 10 server, maybe because of the different java application server running under the hood, prior to version 10. It took a little digging to find out a working equivalent in CF10.

In the code below, I wrapped the call to the WebService that offers the pdf files in a DAO. The nice thing about CFC’s is that apparetly they can also return java objects of type streamReader if you declare the returntype to ‘Any’.

In my view template, I will call the GetStream method on the DAO, and I will stream the content I receive directly to the ColdFusion Output buffer and flush after each 1024 bytes (size could perhaps be chosen better).

The DAO method:


public Any function GetStream(string docType='', numeric docNumber='', numeric docYear='', string docQualifier='', DataType.LanguageIdentifier language) output = true {
var _variables = StructNew();
var _fds=CreateObject("Java", "javax.activation.FileDataSource").init('F:\ColdFusion10\cfusion\tmpCache\temp.pdf');
var _dhl=CreateObject("Java", "javax.activation.DataHandler").init(_fds);

_variables.ws=createObject(“webservice”,”http://contentServer/DocContentServiceWS/DocContentServiceWSPort?WSDL”,{wsversion=”2″,refreshwsdl=”false”,timeout=25});
_variables.result = StructNew();
_variables.result.filenameOut = ”;
_variables.result.errorMessage = ”;
_variables.result.errorCode = ”;
_variables.response=_variables.ws.getmanifestationcontent(‘USERNAME’,arguments.docType,JavaCast(“bigdecimal”,arguments.docNumber),JavaCast(“bigdecimal”,arguments.docYear),arguments.docQualifier,UCase(arguments.language.identifier),’INTRA’,’PDF’,JavaCast(“bigdecimal”,1),_variables.result.filenameOut,_dhl,_variables.result.errorMessage,_variables.result.errorCode);
_variables.inputStream=_variables.response.getFileContent_out().getInputStream();
/*
_variables.outStream=createObject(“Java”,”java.io.ByteArrayOutputStream”).init();
_variables.byteClass=createObject(“Java”,”java.lang.Byte”).TYPE;
_variables.byteArray=createObject(“Java”,”java.lang.reflect.Array”).newInstance(_variables.byteClass, javacast(“int”, 1024));
_variables.length=_variables.inputStream.read(_variables.byteArray);
_variables.offset=0;
while (_variables.length GT 0) {
_variables.outStream.write(_variables.byteArray,_variables.offset,_variables.length);
_variables.length=_variables.inputStream.read(_variables.byteArray);
}
_variables.outStream.close();
_variables.inputStream.close();
*/
return _variables.inputStream;
}

The view template:

FileInputStream = documentsDAO.GetStream(URL.docType,URL.docNumber,URL.docYear,URL.docQualifier,language);
// Response = GetPageContext().GetResponse().GetResponse(); -- this doesn't work in CF10
Response = getPageContext().getFusionContext().getResponse();
Response.setHeader( 'Content-Type', 'application/pdf' );
Response.ResetBuffer();

outStream = Response.GetOutputStream();
byteClass=createObject(“Java”,”java.lang.Byte”).TYPE;
byteArray=createObject(“Java”,”java.lang.reflect.Array”).newInstance(byteClass, javacast(“int”, 1024));
length=FileInputStream.read(byteArray);
offset=0;
while (length GT 0) {
outStream.write(byteArray, offset, length);
outStream.Flush();
length = FileInputStream.read(byteArray);
}
Response.Reset();
FileInputStream.Close();
outStream.Close();

Web Services Atomic Transactions in ColdFusion

June 20, 2014

In order to be able to perform web services atomic transactions, we need to run the ColdFusion code
on a Java Application Server that supports WS-AT. Obviously the Tomcat that ships with ColdFusion does not
support it (out of the box). One could try to plugin the Atomikos transaction manager, but for the purpose of
this test, we decided to deploy ColdFusion on WebLogic and benefit from the WS-AT support that is offered by WebLogic.

In the example below, we will wrap 2 web service invocations in a transaction managed by WebLogic’s transaction manager.
The methods persistDetachedContact in WebServiceA and removeDetachedContactDetail in WebServiceB both require WSAT10,
which means that they can not be invoked if there is no transaction context.

// load webservice classes
wsclassA = CreateObject(“java”,”eu.alrighty.marbie.WebServiceA”);
wsclassB = CreateObject(java”,”eu.alrighty.marbie.WebServiceB”);

// load web service wsdl’s
wsdlUrlA = wsclassA.getClass().getClassLoader().getResource(“META-INF/wsdls/WebServiceAService.wsdl”);
wsdlUrlB = wsclassB.getClass().getClassLoader().getResource(“META-INF/wsdls/WebServiceBService.wsdl”);

// prepare transactional feature
feature = CreateObject(“java”,”weblogic.wsee.wstx.wsat.TransactionalFeature”);
ta = CreateObject(“java”,”weblogic.wsee.wstx.wsat.Transactional”);
flowtype = CreateObject(“java”,”weblogic.wsee.wstx.wsat.Transactional$TransactionFlowType”).SUPPORTS;
version = CreateObject(“java”,”weblogic.wsee.wstx.wsat.Transactional$Version”).WSAT10;
feature.setFlowType(flowtype);
feature.setVersion(version);

// get webLogic Transaction Manager
ctx = CreateObject(“java”,”javax.naming.InitialContext”);
tx = ctx.lookup(“java:comp/UserTransaction”);

// instantiate webService stubs through wsdl’s
wsa = CreateObject(“java”,”eu.alrighty.marbie.WebServiceAService”).init(wsdlUrlA);
wsb = CreateObject(“java”,”eu.alrighty.marbie.WebServiceBService”).init(wsdlUrlB);

// start the transaction
tx.getTM().begin();

// find a contact person from webService A, and create a new contact person with it (increase Id);
contacts = wsa.getWebServiceAPort([feature]).findAllContacts();
contact = contacts[ArrayLen(contacts)];
contact.setId(IncrementValue(contact.getId()));
writeDump(contact.getId())

// find a contact detail from webService B, and create a new contactdetail with it (increase Id);
contactdetails = wsb.getWebServiceBPort([feature]).findAllContactdetails();
contactdetail = contactdetails[ArrayLen(contactdetails)];
contactdetail.setId(IncrementValue(contactdetail.getId()));
writeDump(contactdetail.getId());

// add contact to webService A
writeDump(wsa.getWebServiceAPort([feature]).persistDetachedContact(contact));
// add the contact detail to webService B
writeDump(wsb.getWebServiceBPort([feature]).removeDetachedContactDetail(contactdetail));

// (optionally) dump some information on the status of the transaction
writeDump(tx.getTM().getTransaction().getStatus());

// commit the transaction
tx.getTM().commit();

In the code above, a contact person is added to a database through web service A, running on a
WebLogic A. Secondly, a (non existing) contact detail is removed from a database through web service B, running on a
WebLogic B. Since the second command can not be executed, the first one is properly rolled back, and the test
ends leaving the data in the database to its’ original state.

(Thanks to Petar Banicevic for helping me out with the weblogic transaction manager).

Retrieving a MIME-encoded binary attachment through MTOM with ColdFusion 10

March 6, 2013

Setup:
A Oracle Weblogic (BEA) Web Service returning mime-encoded binary documents (word or pdf) in attachment through MTOM, matching the metadata specified in the request.
A client running on ColdFusion 10, using the automatically generated stub from the WSDL of the Web Service using axis2.

To start, we have ColdFusion generate the stub by invoking the WSDL:

variables.ws=createObject("webservice","http://testserver/CarsDocContentServiceWS/CarsDocContentServiceWSPort?WSDL",{wsversion="2",refreshwsdl="false",timeout=500});

Iomportant: we need to specify wsversion = 2 to force ColdFusion to use axis2. Refreshwdl can be false, we only want the stub to be generated once. Regenerating it each time is time-consuming.
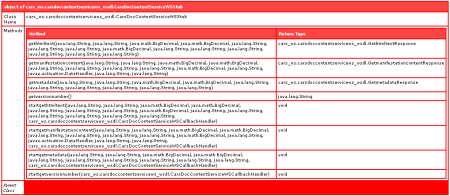
To see what we get back from the Web Service it is always a good idea to dump it:

writeDump(variables.ws);

dump of the webservice and its methods

The method we are looking for is getmanifestationcontent. The first 8 variables are the metadata we need to provide, the last 5 are returned by the Web Service. I create a placeholder for them.


variables.result=StructNew();
variables.result.filenameOut='';
variables.result.errorMessage='';
variables.result.errorCode='';

All set up to invoke the method on the webservice:


variables.response=variables.ws.getmanifestationcontent('MYACC','ST',JavaCast("bigdecimal",5007),JavaCast("bigdecimal",2012),'INIT','EN','INTRA','PDF',JavaCast("bigdecimal",1),variables.result.filenameOut,dhl,variables.result.errorMessage,variables.result.errorCode);

Some of the metadata we passed in had to be casted to the expected datatype. The one oddity in this particular webservice was the ‘dhl’ variable that matches the expected javax.activation.DataHandler data type. Since this is a returned argument, I expected it would be enough to pass just the name of an empty variable and the stub would automatically return a DataHandler object. But the webservice refused to accept any null valued arguments, so I had to build a empty DataHandler object in which even the DataSource had to be specified, even if it would never be used on the Web Service. So I added these 2 lines of code prior to the invocation of the Web Service.


fds=CreateObject("Java", "javax.activation.FileDataSource").init('c:\temp.pdf');
dhl=CreateObject("Java", "javax.activation.DataHandler").init(fds);

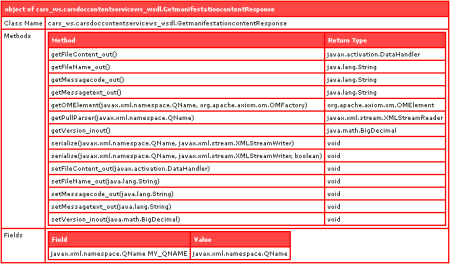
Time to look at the response of our request. I would have expected the response to be in the DataHandler variable dhl. But this was not the case. The attachent was in the response of the invocation of the getmanifestation method itself.
So, again, I dumped it to see what I was dealing with.

writeDump(variables.response);

manifestationcontent response

Clearly, the filename was in the get_FileName_out() method:

saveToFileName="c:\"&variables.response.getFileName_out();

Now the only thing left is to get the binary attachment and I saved it locally to the disk. The getFileContent_out() contained the getInputStream() i was looking for. So I could loop through that until the end-of-file and stream it to the local disk:


inputStream=variables.response.getFileContent_out().getInputStream();
outStream=createObject("Java","java.io.ByteArrayOutputStream").init();

byteClass=createObject("Java","java.lang.Byte").TYPE;
byteArray=createObject("Java","java.lang.reflect.Array").newInstance(byteClass, javacast("int", 1024));
length=inputStream.read(byteArray);
offset=0;
while (length GT 0) {
outStream.write(byteArray,offset,length);
length=inputStream.read(byteArray);
}
outStream.close();
inputStream.close();
FileWrite(saveToFileName,outStream.toByteArray());

While dumping the objects returned from the Web Sevice, I noticed that the Oracle WebLogic WebService used the Apache James Mime4J library. Since it was not by default in my list of libs that ColdFusion is using, I had to download it and put it in the cfusion/lib directory. I didn’t need to reference it anywhere in my code, but it would not run without it, specifically throwing an error telling me that ColdFusion could not find a specific class within this library.

Grabbing the message body with Exchange Transport Agent

June 24, 2009

Exchange Server 2007 came with a new transport architecture, which you can so joyfully admire on http://technet.microsoft.com/en-us/library/aa996349.aspx.

I had this project where we needed to exchange emails between 2 networks with a different classification, and of course SMTP was one of the protocols that was not allowed to pass the bridge between both networks.

In fact, the only thing that was allowed was xml and this would be enforced with a xml firewall which would validate the xml packets against a set of predefined schema’s.

So, for us to be able to get the message through, we would have to intercept all email traffic, filter them -based on recipients- and serialize the outbound messages to send them through the xml gateway.

A possible solution was writing a Transport Agent that could be plugged into the Exchange Server, and that’s exactly what we did.
Intercepting the messages and route them, based on recipient was easy. There are numerous documents online that show you how to write a Transport Agent that logs all messages, or modifies the recipient list, …

In fact, the hardest part was grabbing the message body, simply because it was always formatted in unicode/utf16, regardless of our efforts to save it in utf8. A lot of older email clients don’t support the display of message bodies in unicode/utf16 and typically you would always see just the first character of the body followed by some weird character.

The solution to this problem lies in the fact that the message body, accessible through the MessageEventArgs e.MailItem.Message..Body.GetContentReadStream() is encoded in unicode/utf16. This should not be a problem if it could be directly streamed to a file with proper encoding defined.

Unfortunately there is no direct way to do this, so we ended up with adding a StreamReader to it, permitting us to read the stream line by line and writing it to a StreamWriter attached to a FileStream.

Even though we specified the StreamWriter to use Encoding.UTF8, somehow the file got always populated with what seemed like Unicode/UTF16. Our mistake was connecting the StreamReader with default arguments to the e.MailItem.Message..Body.GetContentReadStream(). In C#, by default a StreamReader uses utf8 encoding, where our Body was encoded in unicode/utf16. By telling the streamReader tu use Encoding.Unicode (UTF16) we were finally able to properly convert the message body to utf8 and save it to our xml file.

Here’s some code snippet:


StreamReader reader = new StreamReader(e.MailItem.Message.Body.GetContentReadStream(),System .Text.Encoding.Unicode, true);
FileStream fso = new FileStream(workingDir + @"\" + MessageGuid + ".body.processing", FileMode.OpenOrCreate, FileAccess.ReadWrite);
StreamWriter writer = new StreamWriter(fso, Encoding.UTF8);
string temp;
while ((temp = reader.ReadLine()) != null)
{
 writer.WriteLine(temp);
}
writer.Flush();
writer.Close();

fso.Close();
reader.Close();

Kerberos delegation and Service Identity in WCF

May 30, 2008

Scope:

Step-by-step walkthrough to establish a secure connection between a WCF Client and Service by using a Kerberos token. This example will focus on message security, though WCF also offers transport security. We will establish mutual authentication between service and client, using the wsHttpBinding.

Kerberos delegation will only have to be granted to the Service, not to the Client. We can choose to run the Service under a NetworkService or Localsystem ‘service’ account, or under a ‘domain’ account (domain\user). The Service will be self-hosted (serviceHost).

Requirements:

.NET 3.5

.Windows Domain with Active Directory

.Domain Administrator access
Tools:

SetSPN.exe, Klist.exe, Kerbtray.exe

SetSPN.exe makes it easy to define service principal names for computers or user accounts in the active directory. The other 2 tools can be useful to inspect the kerberos tickets on the machine where you will run the WCF Service. They can be downloaded from the microsoft site, in one of their Resource toolkits for windows servers

Running the Service under a Service Account

1. The Service

Code:

using System;
using System.Collections.Generic;
using System.Text;
using System.ServiceModel;
using System.ServiceModel.Channels;
using System.ServiceProcess;
using System.ServiceModel.Description;

namespace WCFWithKerberos
{
    class Program
    {
        static void Main(string[] args)
        {
            // create the service host
            ServiceHost myServiceHost = new ServiceHost(typeof(Echo));

            // create the binding
            WSHttpBinding binding = new WSHttpBinding();
            binding.Security.Mode = SecurityMode.Message;
            binding.Security.Message.ClientCredentialType = MessageCredentialType.Windows;

            // disable credential negotiation and establishment of the security context
            binding.Security.Message.NegotiateServiceCredential = false;
            binding.Security.Message.EstablishSecurityContext = false;

            // Creata a URI for the endpoint address
            Uri httpUri = new Uri("http://yamata:8000/Echo");

            // Create the Endpoint Address with the SPN for the Identity
            EndpointAddress ea = new EndpointAddress(httpUri, 
                              EndpointIdentity.CreateSpnIdentity("HOST/yamata.marbie.net:8000"));
            /* works with
             *  setspn -a HOST/yamata.marbie.net:8000 yamata
             */

            // Get the contract from the IEcho interface
            ContractDescription contract = ContractDescription.GetContract(typeof(IEcho));

            // Create a new Service Endpoint
            ServiceEndpoint se = new ServiceEndpoint(contract, binding, ea);

            // Add the Service Endpoint to the service
            myServiceHost.Description.Endpoints.Add(se);

            // Open the service
            myServiceHost.Open();
            Console.WriteLine("Listening...");
            Console.ReadLine();

            // Close the service
            myServiceHost.Close();
        }
    }

    public class Echo : IEcho
    {
        public string Reply(string message)
        {
            Console.WriteLine(message);
            return message;
        }
    }

    [ServiceContract]
    public interface IEcho
    {
        [OperationContract]
        string Reply(string message);
    }
}

Configuration

‘Yamata’ is the name of the machine I will be running the Service on.

Now we need to grant Kerberos delegation to this machine. For this, we will connect to the Domain Server and ‘Manage users and computers in Active Directory’. Browse to the computer name (yanaga in my case), in the ‘Computers’ tree, rightclick to select ‘properties’, select the ‘Delegation’ tab. For simplicity, we will Thrust this computer for delegation to any service, but you can tighten it to the service of type ‘HOST’, and limit it to specific ports (8000 in our example) if you want.

Next, we need to add the service principal name (SPN) we used in CreateSPNIdentity (HOST/yamata.marbie.net:8000) to the computer. On the domain controller, we can exete in a dosbox the following command:

setspn -a HOST/yamata.marbie.net:8000 yamata

Verify that there are no double entries, with the command: setspn -L yamata

Double entries will break the kerberos authentication.

The next important thing we need to do is make sure this kerberos ticket is propagated to the machine where we want to run the service. Most often, this can be done by -on the machine where we will run the service- lock the screen, and unlock it by typing in the password. This should cause a refresh of the kerberos tickets. Klist.exe or Kerbtray.exe can offer you insight on the list of tickets on your machine. The entry SPN we added should be in this list. If you use Kerbtray, you can check if the ‘delegate’ checkbox is checked dor this entry. It should be. If it is not, the ‘Kerberos Delegation’ right has not been granted to the machine for this Service.

Now, we can launch the Servide under a service account, we will use the LocalSystem account on yamata in this example. To do this, we execute the following command in start| Run:

at HH:mm /i cmd.exe

where we replace HH:mm with the current computer time + 1 minute. Wait a minute and a dos box pops up. This box will not run under your local computer user account, but under LocalSystem. In this dos box, we startup the WCFWithKerberos.exe

2. The Client

Code

using System;
using System.Collections.Generic;
using System.Text;
using System.ServiceModel;
using System.ServiceModel.Channels;
using System.ServiceProcess;
using System.ServiceModel.Description;

namespace Client
{
    class Client
    {

        private ChannelFactory factory;
        private WCFWithKerberos.IEcho echoClient;
        private WSHttpBinding myBinding;
        private EndpointAddress ea;

        public Client()
        {
            // Create the biding
            myBinding = new WSHttpBinding();
            myBinding.Security.Mode = SecurityMode.Message;
            myBinding.Security.Message.ClientCredentialType = MessageCredentialType.Windows;

            // disable credential negotiation and the establishment of a security context
            myBinding.Security.Message.NegotiateServiceCredential = false;
            myBinding.Security.Message.EstablishSecurityContext = false;

            // Create the endpoint address and set the SPN identity.
            // The SPN must match the identity of the service's SPN
		ea = new EndpointAddress(new Uri("http://yamata:8000/Echo"), EndpointIdentity.CreateSpnIdentity("HOST/yamata.marbie.net:8000"));
            /* works with
             *  setspn -a HOST/yamata.marbie.net:8000 yamata
             */

        }

        static void Main(string[] args)
        {
            Client c = new Client();
            c.Open();
            c.echoClient.Reply("test");
            c.Close();
        }

        public void Open()
        {
            // Create the proxy during runtime
            factory = new ChannelFactory(myBinding,ea);
            echoClient = factory.CreateChannel();
        }

        public void Close()
        {
            ((IChannel)echoClient).Close();
        }

    }
}

Configuration

It doesn’t matter under which account or where you run the client, as long as we run it under an account or on a workstation that is properly logged in into the domain (received valid kerberos ticket). Open a dos box and launch the Client.exe

The Service should echo ‘test’ in the console and the client should exit without output or errors. Even when we disabled credential negotiation and security context establishment, we have connected our Client to the Service on a secure way by letting WCF handle all the authentication hassle through the delegation of Kerberos.
Running the Service under a Domain Account

Configuration


There is nothing that needs to be done on the code side, if we re-use the same SPN.

We need to remove the SPN entry from the computer on the active directory, with the SetSPN tool:

setspn -d HOST/yamata.marbie.net:8000 yamata

Now we add the SPN to the domain account.

setspn -a HOST/yamata.marbie.net:8000 marbie\dreezst

where ‘dreezst’ is the domain user and ‘marbie’ is the domain name, under which I will be running the Service.

Additionally, we need to go to the Active Directory again, browse to the user ‘dreezst’, and grant kerberos delegation.

Next, we need to update our kerberos tickets on our Service machine by locking and unlocking the Computer again. Use Klist or Ktray to inspect your kerberos tickets and see that the SPN entry is there and updated. With Ktray, verify the delegation checkbox.

Now, we need to run the service as our domain account. In a dos box, enter: runas /user:marbie\dreezst WCFWithKerberos.exe, and enter the password for the domain user.

Once the Service is up and listening, launch the client from any machine under any (logged in) account.

The difference here is that we are running the Service under a domain account, which will probably be more likely in a production environment where you typically have domain accounts that are configured as Service accounts to run these services.